The Best Microphone, Webcam Camera and Other Tools for Conducting a Webinar
Conducting webinars is one of the best strategies to build your brand, turn cold leads into warm prospects via personal interaction and eventually generate sales of your online courses or any other product or service.
But conducting a successful webinar depends on a lot of things like having strong valuable content, a clear sales pitch (if you are selling something), correct promotion methods to make sure you get attendees and lastly, the usage of the correct tools, equipment and software.
For this article, we will concentrate on the last part – using the correct tools.
The first thing that comes to mind when you hear the word webinar is little windows where people are being seen. That means one of the most important tools is going to to be the webcam. So let’s start with that:
Which is the best webcam for a webinar?
The truth is that it depends on you and your budget. As with anything else, the more you are willing to pay, the more the number of options.
But here’s the thing – Many people think they need to have the most expensive webcam out there in order to do a successful webinar. This is not entirely true and I’m a living example of this.
As of now (11th August 2021), I use the Logitech C920 HD PRO (Around Rs.11,000 at the time of writing) to conduct my webinars and it’s never caused me any problems at all.
But since it can be a bit expensive, I’ll start off this list with a budget webcam that I used for a very long time:
Logitech C270 (Good Budget Friendly Option)
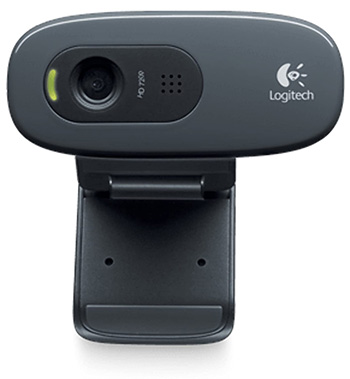
The Logitech C270 webcam is so popular that during the COVID lockdown and in its aftermath, it was not even available anywhere including Amazon because literally every working professional who had to rely on Zoom meetings had purchased it.
Why is it so popular? Because it’s cheap and does the job well. No rocket science here.
What is the downside? The downside is that it only offers a HD (High Definition) resolution, which means a resolution of 1280 X 720 pixels. That basically means you have lesser pixels in the output which in turn means that you don’t get the most clear picture.
But is the clarity enough to get by? I certainly think so. Have a look a short clip from one of my webinars where I teach my students how to create and sell online courses:
You’ll see that it’s not too bad at all especially considering the fact for most of the duration your webinar, you’ll actually be appearing in a small window since most of time you will be sharing your screen to show a presentation or something else.
Appearing in a small window means that resolution doesn’t play such an important part since the pixels aren’t getting stretched.
Till now I’ve never even had a single student who has complained during the webinar about the video quality. In fact what you have to realize is that your students are more interested in how good your content is. And as you’ll see later on, using a good quality mic is more important that the webcam.
Also, I’ll tell you one more benefit about using this webcam which NO ONE TALKS ABOUT!! But I’m going to talk about it because that’s what Click Trainers is all about. Talking about the real life things that no one else talks about.
So here’s the thing – A lot of us are slightly shy in appearing in front of an audience. For example, my webinars are usually for 100 people. Imagine 100 people looking at you virtually. We can get really conscious about our appearance. The fact that this webcam has a lesser resolution actually helps in this case LOL! Yes, the slightly lesser clarity that you get can actually make you look better by hiding your facial flaws. I know because I have too many of them (LOL again). It just comforts me to know that my webinar audience is not getting a microscopic FULL HD view of my amazing rashes, unkempt facial hair strands, milia, pimples, scars and what not! For some of us, FULL HD resolution may even stand for FULL HIDEOUS! Talking about Full HD, let’s move on to the next recommendation:
Logitech HD PRO C920 (The Most Popular Option)
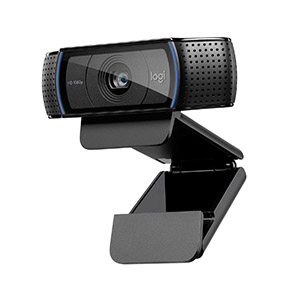
The Logitech C920 is probably the most popular webcam for webinars and screen recording. I am currently using it myself.
This webcam has stood the test of time and is very reliable. Don’t get confused by the name though. It offers FULL HD resolution and not HD. You can use this webcam for anything, right from webinars to creating videos.
It’s very sharp,produces great colors and contrast and the 78 degree field of view I feel offers the perfect amount of width.
You can use the Logitech Capture software (free) to make any sort of adjustments you wish.
This webcam currently has over 22,000 reviews on Amazon so you really can’t go wrong with this choice.
Though a point to note is that its successor, the C922 is also getting good reviews everywhere. Though I haven’t used the camera myself.
Logitech C930e (Another good option but with a wider view)
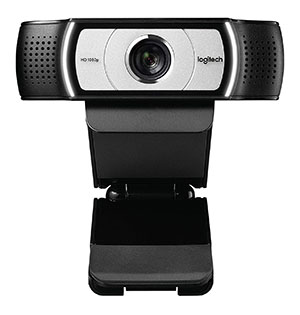
The Logitech C930e is also a good choice especially if you want to have a very wide field of view. I should point out that you can always zoom in too in case you feel the default width is too much.
This is priced slightly higher than the C920 and is branded as a business webcam and it’s wider field of view implies that it is geared towards webinars in which an entire group has to be seen.
One thing you cannot obviously ignore is its looks. At one point, I was tempted to get this webcam simply for the unique white and black finish.
Final verdict: It’s perfectly fine to go for a cheaper webcam if you don’t have the budget. When you are doing webinars, it’s initially more important to focus on audio, content and the promotion side of things. Once you know you have a winning webinar formula, you can always upgrade to a better webcam. But if budget is not an issue and you want a better video quality, then expensive options are better for sure.
These days there are a lot of cheaper FULL HD webcams available too which cost 1/4th the price of the webcams mentioned above. You can go for those too but keep in mind they may not always have a software to tweak the default settings of the webcam. Whenever you buy a webcam, one thing I always recommend you do is to go to YouTube and check reviews around it to see the actual output it produces.
Which is the best microphone for webinars?
Like I mentioned before, audio is more important than video when you are conducting a webinar.
NEVER use the built-in microphone of your laptop or your webcam for your webinars. The sound will be terrible. You HAVE to use an external mic. Before we go any further, hear the two sample audios below. The first one has been recorded by the built-in mic of my laptop. The second one has been recorded by an external microphone. You’ll be able to hear a massive difference in quality between the two. Make sure you are wearing headphones to notice the difference clearly.
Good quality mics are very important for webinars because when you are creating a normal video for your online course, you can still make modifications to the output by removing noise and adding other enhancements in post processing. But during a live webinar, you are completely dependent on the real time output of the mic.
I always suggest my students to go in for a USB microphone as it’s easy to use. You simply plug it in the laptop/PC and you’re good to go.
Now here’s the thing about USB mics. There are a crazy number of good USB mics (put amazon link page) out there and one search on Amazon will prove that. So before I go on and name a specific mic from a specific brand, let’s first talk about the some of the factors that you should pay attention to so you also know what to look out for generally:
- First of all, the USB mic you choose should not be very cheap. When it comes to audio, there’s a very simple rule. The more expensive the mic is, the better quality output it will produce. Cheap mics (especially those costing less than Rs.2000) will be very sensitive to noise (the hissssss sound). For example, when I use my Blue Yeti mic (an expensive USB mic which I’ll talk about later on) for my webinars, the fan in my room above me is going on at full speed and yet the output it produces is amazing. In fact many of my students always mention how clear my voice is during the webinar.
- Secondly, make sure you get a USB mic which has a built-in stand. Otherwise you’ll have to purchase a separate stand/arm which is actually better than using the built-in stand but I would not recommend it for complete beginners since buying an external stand requires a bit of research to make sure it’s of good quality and that it fits your mic.
Let’s look at some well known USB mics that have stood the test of time:
Blue Yeti USB Mic (Most Popular Option)
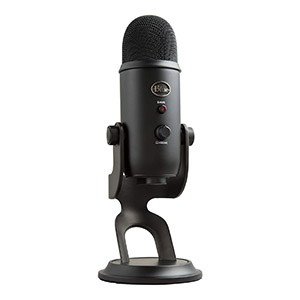
Blue Yeti is one of the highest selling USB mics in the world. I have been using this amazing mic since 2016 and it’s never disappointed me. I use it both for my webinars as well as for screencasting videos for my online courses. The second sample audio that you heard above was from this mic.
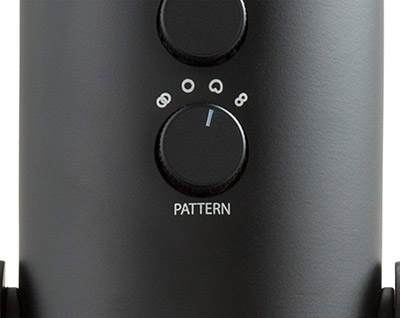
One of my favorite features about this mic is that it offers different pick-up patterns. That means you can set it in such a way that it only picks up the sound mainly from the front side (your voice) and ignore the sounds from the back and the sides. This is called as the Cardioid pick up pattern, which can be set up just by using a knob on the mic, as show in the image below:
It’s also a pretty heavy mic and the stand is very sturdy. And since it’s a USB mic, it’s basically plug and play. Definitely my first recommendation since I have first hand experience with it and the best part is that you don’t have to really break the bank to get it. I know it’s not the cheapest mic too but like I mentioned before, you will NEVER regret spending slightly more on a good quality mic because good audio is super important for an online course creator, whether that’s for a webinar or for video creation.
Blue Snowball USB Mic (Good Budget Friendly Option)
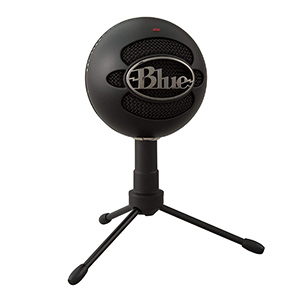
If you have a tighter budget, then the Blue Snowball USB mic is the one for you. It comes with a Cardioid Pickup pattern so it’s great for voice-overs/webinars.
Honestly speaking, I would not recommend that you go lower than this. This is probably the cheapest good quality mic that you should be going for.
Rode NT-USB Mic
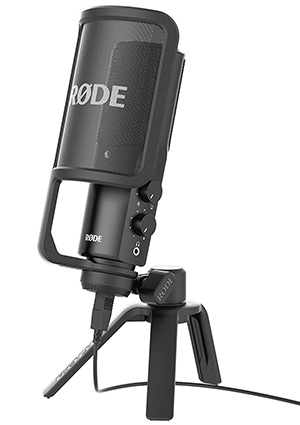
You can never go wrong with a Rode mic. The Rode NT-USB might be expensive but if you really want the best audio output, then don’t think twice. Rode has recently come out with a mini version of the NT-USB which is also slightly cheaper.
Final Verdict: Since audio is the most important thing, spending money on a good microphone is a great investment. Good quality mics last for a very long time so it will eventually not turn out to be that costly if you go for an expensive option. Since I have personally been using the The Blue Yeti for quite some time and been impressed with it, that would be my recommendation. If budget is an issue, then go for the Blue Snowball.
What type of lighting is best for a webinar?
First of all, lighting is not an absolute essential for a webinar but it can definitely improve the webcam video quality since more light means the cameras sensor doesn’t have to do too much work which can otherwise result in an increase in the ISO value which basically means more noise and lesser clarity in your video.
This is especially true for cheaper webcams which don’t perform very well in low lighting situations.
Better lighting can also make you look more presentable.
I always suggest you go for flat lighting. Which basically means that you need to place a light source directly in front of you.
In the room where I do my webinars, I actually got an extra tube light fitted in the direction in which I am looking when I’m doing my webinars. You can see this in the image below:

If you don’t want to get an extra light fitted in your room, then you can go in for an external LED light like the one below:
Which software is the best for conducting a webinar?
Simple answer here. ZOOM. I’m assuming you are a beginner in the webinar world and for a beginner, Zoom has literally changed the webinar game.
The funny part is that Zoom isn’t actually meant for webinars. It’s just a software for team meetings (though they do have an expensive webinar add-on too).
But because they allow 100 attendees and a maximum of 40 minutes on their free plan, a lot of people naturally started using Zoom for webinars.
When you see the costs involved with using proper webinar software like GotoWebinar, Webinar Jam, Demio, etc, you’ll realize why Zoom is so popular.
Now the 40 minute time limit is definitely less so in all probability you’ll at least have to go for the basic paid plan which allows you to host longer meetings (webinars). But that’s still only Rs.1300/$14.99 per month which is nothing as compared to the monthly costs involved in the other webinar software I mentioned above. For instance, currently, GotoWebinar costs $109 for their basic plan which allows you to host 100 participants.
But here’s the best part about Zoom – Just because you are paying less does not mean Zoom’s quality is any lesser than other webinar software. In fact Zoom’s reliability (chances of freezing/crashing) and video/audio quality is even better than some of the more expensive options out there.
The downside of using Zoom is that unlike the dedicated webinar software, it doesn’t come with some of the important marketing features like built-in email marketing integrations, landing page templates, ability to make one-time offers during a webinar, etc. That’s because it’s not meant for webinars.
But this is not a deal breaker at all especially if you are a beginner. All of these missing tasks can be done manually. What’s more important when you are a beginner is that you don’t end up spending crazy amount of money which can be put to better use like in promoting your webinar and growing your online course business. .
What you have to remember is that one of the most challenging parts of doing a webinar is actually not related to the software or the platform you are using. The real challenge lies in knowing how to promote a webinar so you get as many attendees as possible. Once you’ve mastered that skill and are comfortable doing webinars using Zoom, you can always decide to make the upgrade to a more advanced webinar platform.
I hope you liked this post. If you have any questions or would like to know more about webinars or webinar related resources, do leave a comment in the comments section below and I’ll be happy to assist you.


Can Blue Yeti USB Mic be used for Video Recording on Mobile Phone ?
Hi Milind, no the Blue Yeti is a USB mic that is meant for Laptop/PC. For recording with a mobile, the better option would be to go for a lavalier mic/collar mic. You can see my other article on Resources for Online Course Creation where I have mentioned the lavalier mic I use.
Thanks for your details
Can you plz suggest best mic with headphones used for live/recorded class webinar On zoom
Hi Shabnam, I would not recommend you go for a mic with headphones because as mentioned in the article, audio is of primary importance while doing a webinar and mics that comes with these headsets are usually not upto the mark. It’s always better to get a dedicated mic like ones I mentioned in the artcile and then you can connect your headphones to this mic.
Good Information
Thank you!